
Gordy Sticker Pack Pre-orders are open now here.
Since writing the breakdown of my PTW based Blood Diamond Carbine, quite a lot has changed. In truth I didn’t hang around long before embarking on my next project, which was largely based on the foundations provided by the Blood Diamond build.
Back in May we visited Stirling Airsoft’s the Trees site for Op BARHAIL, and due to the inherently “Lone Survivor-esque” feel of the place I decided to stick a cheap, £6 Cyma suppressor on the BD carbine to make it feel more like a Marksman’s rifle and behold, the 723 build had begun.
background behind the build
For those who don’t know the Colt 723 was the rifle used by Delta Force during some of their most iconic early excursions, namely the operations Acid Gambit, Desert Storm and Gothic Serpent (or Panama, the first Gulf War and the ill-fated “Black Hawk Down” mission in Somalia respectively). With the recent nostalgia for all things 90’s coupled with the simple fact that this was the era of ally DIY guns and kit, many people have taken to the 723 aesthetic, myself included.


The guns themselves in real life consisted of a C7 upper, 14.5″ barrel (M4 or pencil profile), skinny CAR-15 handguards and a 2nd or 3rd gen Colt collapsible stock. This combination of parts really shows that the 723 was the final step in bridging the gap between the CAR-15 of the late 80’s and the M4 and M4A1 of the 90’s and 00’s. While the base 723 parts themselves bear the hallmarks of the M4’s of the future, the real draw for me was the operator ingenuity that went into bolting the then limited weapon attachments to it, once again demonstrating the parallels of what was available at the time with what would be universally successful in the future.

So where did the Blood Diamond build fit into all of this? Well, the base gun was “there”, being a carry handle upper with a 3rd gen collapsible stock and 6 hole skinny handguards. I’d also already dabbled with the carry handle mounted optic and low profile torch mounting system and liked it. In the Blood Diamond breakdown I specifically said that the thing holding me back from doing a proper “Gordy” rifle was being able to track down an Aimpoint 5000, and an original Surefire 660. Well, as shocking as it may sound I wasn’t happy settling for what was available and instead started looking for the far more elusive “1st generation” versions of what I had to hand.
And here we are today.
The “Gordy” 723

Before going into the breakdown of the build itself, it’s worth saying a few words on why I refer to this rifle as a “Gordy” 723. In truth, it is actually a long way from an accurate representation of the rifle carried by MoH recipient Gary Gordon on that fateful day in 1993, but carries enough of the features that makes it instantly recognisable to many as a Gothic Serpent Delta Marksman’s 723, leading to it being called a “Gordy” more by accident than on purpose. In either case I wanted my tribute to the legendary rifle to be as well put together as possible, and while maybe not 100% historically accurate, it did have to be done properly.
The base gun

The base gun itself is still largely unchanged from the Blood Diamond breakdown, but for new readers I’ll quickly blast through it, and the single, and most important change that I’ve made. Starting at the butt, we still have the same B5/Brownells reproduction 3rd generation “Colt” collapsible stock, adorned with a Warlord Tactical clone of the Diemaco butt pad. While the butt pad is horribly incorrect, it is unfortunately necessary to keep the batteries powering my Systema PTW base gun hidden away and protected.

I have been made aware of a number of other butt pads out there, including the CAG-tastic John Masen. Personally I prefer the aesthetics of the Diemaco pad, but as with everything else in life I’m sure I’ll become dissatisfied with it and replace it with a more clone correct one as time goes on. The stock tube is a standard Systema 6 position model, incorrect as far as the clone goes but necessary for the gun to actually function, and as D boys drilled holes in their 2 position ones to suit their bodies seeing a 723 stock sitting part way up the buffer tube is not actually an eyesore at all.

What is a blatant eyesore and something that irks me whenever I think about it is the Magpul ASAP snuggled away between my receiver and buffer tube. Unfortunately this isn’t a simple part to swap out, and it does provide the sling positioning that I prefer to use. I’d love to get rid of it, but as it stands it’s a part that will be hanging around for a while. If all else fails I might just take a Dremel to the stabilising wings and turn it back into a standard AR15 receiver end plate.

Coming into the receivers we meet the newest part of the ensemble, the M16A1 style pistol grip. This is in fact an A2 grip that has had the nub filed flat, and unfortunately this is as accurate as I can be at this point, due to the nature of the Systema PTW’s motor being concealed inside. It passes the squint test, and is a damn sight nicer to look at than the Gordy rifle set up with an MOE or LMT Ergo grip attached, which while comfortable was just a step too far off the proven 723 track for me. The other modernism still present on the 723 lower is the Magpul enhanced trigger guard. This is wildly anachronistic, flat out wrong really, but is the one thing making the otherwise uncomfortable “A1” grip bearable, so I’m afraid it’s here to stay.

The upper receiver is where I start to wince uncomfortably. The Colt 723 is defined by a number or parts, the most notable of which is the M16A1/C7 type upper. This is the last major part missing from my build, which actually would be more correctly named a 727. But it’s 2021, I can identfy as a bisexual crab if I want to so fuck you I’m calling it a 723. In all seriousness, I have got an M16A1 upper ready to be merged with a Systema M4 upper, and when that happens I will be calling the build “complete”.

Moving forwards, nothing much has changed from the BD carbine, but this is only as this part of the gun was already “correct”. The same 6 hole CAR-15 handguards are present, with a slanted delta ring and an M4 front sight post. A part of the front end that is strictly incorrect is the 10.5″ barrel, but I’ll address this later on in the breakdown and all will make sense.
Optics
For me there is one attachment that separates a good 723 clone from a simple Black Hawk Down movie gun clone, and that is the optic setup. In the film, all the D boys can be seen cutting about with Aimpoint Comp M2s on A.R.M.S #02 carry handle mounts, neither of which are accurate to what was used at the time, especially as the M2 wasn’t invented for another couple of years after 1993.

Instead, the correct optic for a Gothic Serpent 723 is either the Aimpoint 3000 or 5000, which are the Aimpoint ACET optics of the generation preceding the M2 series. I managed to secure an Aimpoint 5000 XD, which while slightly incorrect thanks to the XD being an upgrade of the 5000, is still identical in its external dimensions and therefore gives the correct look with the best possible internal electronics.

This optic is then mounted to a Maryland Gun Works carry handle rail mount. Back in 1993 the classic straight Weaver rail would have been used, but these are rarer than fucking hen’s teeth now and as Larry Vickers uses the MGW rail on his personal 723 build I feel that it fits the bill for mine. The vertically split Aimpoint low mounts finish off the setup, and also keeps the optic nice and low to the rail.

From my (the user’s) perspective this setup is identical to the M2, but when viewed from the side it just gives the rifle the right image. From a functional perspective the 5000 setup is just as comfortable, just as quick for target acquisition and is also just as usable with NVGs when used on the lowest setting (not true IR, just a very very dim red). The only disadvantage of using the older optic is that despite the 5000 XD having a longer battery life than the original 5000, it still only has around a month of continuous runtime, as opposed to the years that you get out of the M2. While this may sound like something of a non-issue, being used to simply leaving optics turned on means that one slip might lead to an expensive 1/3N being wasted and potentially leaking into what is a valuable and hard to find optic.

Overall though, I fucking love the 5000 setup, and it is the part of the gun that I think really kicks it into the realm of a “good” 723.
Lighting
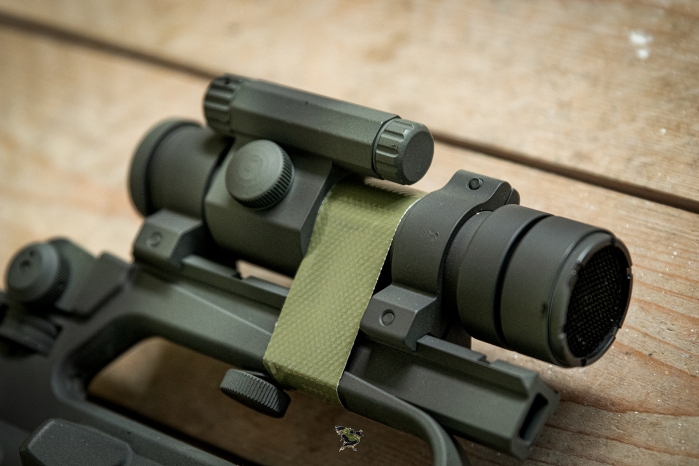
As with the Blood Diamond carbine the lighting setup is a big part of the build. Only one part of the BD lighting setup was carried over to the 723 however: the cut down clone of a Surefire M14 barrel mount. This was necessary because of the suppressor hanging off the front of the rifle, and in my opinion is neater and more pleasing than the correct method of adding a picatinny section to the handguard, and attaching the light with an Aimpoint split ring.

Between the barrel mount and the torch is a Surefire/Weaver M10 ring, which is a key part of the Surefire 660 kit and in making the rifle look the part.
The centrepiece of the lighting setup is obviously the Surefire 660, and my model is actually an original “Sure Fire Laser Products” edition, making it not only the correct model but also the correct age. With the torch down at a low 45° angle the use of the OG tape switch is mandatory, and this is secured in place with a length of 3M OD duct tape. Original 100mph tape would be better, but it is surprisingly hard to get in the UK!

Inside the 660 I’ve decided to stick with the original incandescent bulb purely for the reasons that I don’t really use the torch that often and it’s entertaining to play in dark environments using the 4 lumens that were available to the guys back in 1993. What this does throw into sharp focus is that NVGs were more than likely the preferable night fighting option, as the white lights hadn’t yet become good enough to warrant their overuse, which brings us on to part 2 of the lighting setup.
Another part of my Gordy interpretation that I really like is the ability to mount a PEQ-2A using the USGI M16/M4 barrel mount, concealed within the CAR-15 handguards. In Somalia during 1993 the guys were actually running around with AIM-1Ds slung to the front of their rifles (making use of their full 100mW of retina destruction while they’re at it), as the PEQ-2A didn’t yet exist, but as the barrel mount was the best option for mounting them to M16s and CAR-15s and AIM-1Ds are almost as impractical as they are hard to find I’m happy to use a PEQ-2 instead.

This is really just a trivial part of the build for me, as I will rarely actually use it at night, but it’s a fun part to include and always get’s a knowing nod from those who recognise the two little plugs sticking up from inside my handguard.

The business end
The final piece of the 723 puzzle, and the one most responsible for it being somewhat incorrectly labelled a “Gordy” is the suppressor, which can be approached in a number of ways.
The correct way is to have a 14.5″ barrel used in conjunction with an OPS Inc. overbarrel suppressor, which a locking collar aiding in securing the can to the end of the rifle. In airsoft terms these have become incredibly hard to find recently, and in my own case I already had a 10.5″ barrel installed, and wanted to see if I could make a workaround.

The suppressor I chose to use is a cheap as shit Cyma can, with changeable threads on either end and knurling on one end of the suppressor body. This passes comfortably enough for the OPS Inc. suppressor aside from the fact that it is missing the iconic taper at the near end of the can. To get around this, I asked Tom from AATV Airsoft to 3D print me one of his reproduction OPS Inc. locking collars, which sandwiches nicely between my suppressor and my front sight post, marrying the two together in a convincing representation of the OPS Inc. silencer.

I’m not 100% sold on this solution, as while it looks the part it is just a little too short overall to be perfect, and doesn’t allow me to also run around with the rifle set up in a bare 14.5″ barrel 723 configuration. For that reason I am currently in the process of hunting down the correct suppressor, to be matched with a replacement barrel for my rifle.
While I’m not completely happy with it, the suppressor setup I have definitely looks the part at first glance and was incredibly cheap, allowing me to “finish” the 723 quicker than if I had waited for the right model to jump up on the second hand market.
Putting the “Gordy” 723 to use


Since writing the Blood Diamond CAR-15 breakdown I have managed to put the setup to a lot of use throughout all the incremental changes, and I have not stopped loving it the entire time. The simple fact of the matter is that it is a slick, lightweight setup that just looks the dog’s bollocks. It never fails to turn heads, and every person that picks it up always stops for a second and says “ooh yeah, that’s nice”. While it’s not good to be a narcissist, it would be lying to say that I didn’t get a kick out of those little moments.
I enjoy people admiring this build less because it’s mine and people think that it’s objectively cool, but more because it’s promoting a style of gun building that actually involves hard work and effort to complete, which naturally makes you proud to own it at the end.
Just sourcing the parts for this build alone have been a mammoth effort, and for most people even finding the carry handle upper to start it with is a pain in the arse. With the parts in hand, then finding ways to make them work on the gun yourself and actually having to use tools to do so, means that the finished product is intrinsically yours, no one else’s, and that is something to be proud of.
In a community where just about everything is available online and can simply be bolted or MOLLE’d on, the equivalent of setting a game to hard mode is to try and build a classic retro gun with original parts, and without using someone else to do the machining. The DIY element, the getting it wrong and having to fix it on the fly or be faced with another few months parts hunting, is what really makes my “Gordy” 723 special to me, and if you’re on the fence about getting one for yourself I say you absolutely should do, but for the love of god do the thing properly.
Thanks for reading through the breakdown of my “Gordy” 723 PTW build. Hopefully it was useful for anyone out there looking to do something similar with theirs. Obviously as this is an airsoft gun, there are parts of the build that are simply not relevant to the real steel community, but wherever possible I’ve tried to use RS parts and barring the firing action, the cosmetics of my build should also translate largely to a real build.
There’s not really any one business to thank for helping with the build, but there is one person: @penguindynamix. While he may be both a crab and a Rupert, a combination which should by all rights make me think of him as lower than pondscum, he’s actually an alright bloke and has an almost encyclopaedic knowledge of this era of Delta Force. While he hardly held my hand going through the build, just chatting to him and getting a better idea of what was going on at the nuanced operator level helped to get the build over the line. He also provided the OD green tape.
If you’ve got any questions about this build or any others please shoot them over to my Instagram account @thegeardocrow where you can either get answers or call me a cunt. If you’re reading this before the 5th of November 2021 you can also get on the Gordy Sticker pack pre-order by clicking here.
Cheers cunts.
